Raspberry Pi Setup in Headless mode
Rpi has Ethernet port which can be used to connect Rpi to Local Area Network(Wired)
Rpi 3 B+ has on board Wi-Fi which can be used to directly connect to your Wi-Fi router or mobile hotspot.
Rpi Connections:
- Ethernet Cable Required for wired connection(No need if Rpi 3 B+ as it has onboard Wi-Fi)
- Power Adapter
If Rpi 3 B+ is used it should be first connected to Wi-Fi using standalone mode(with monitor) as we need to select Wi-Fi network and input Wi-Fi password. This is one time activity.Once connected their after Rpi 3B+ can connect automatically to that Wi-Fi network.
Connect the Pi to your internet router with an Ethernet cable, then plug in the power cord so it boots up.
Once Rpi gets connected to Local Area Network(LAN)/Wi-Fi it will be allotted IP address.
We need to find this IP address in order to access our Rpi.
There are lots of ways to do this, but Advanced IP Scanner is pretty easy to use. It will scan your home network and list all connected devices and their local IP addresses.
Download and install this software on your PC.
Get your PCs IP first.
- Start Windows command prompt: cmd.exe from start menu.
- Type command ipconfig & hit Enter
- Output of above command will give your PCs IP
- e.g. 192.168.43.137
Now Open up Advanced IP Scanner
- Put IP Range: 192.168.43.1 - 192.168.43.254
- Click “Scan” in the upper left hand area of the window.
- A list of the connected devices and their local IP addresses will be generated:
Write down the IP address for the device that says Raspberry Pi Foundation in the “Manufacturer”
Thats your RPis IP Address.
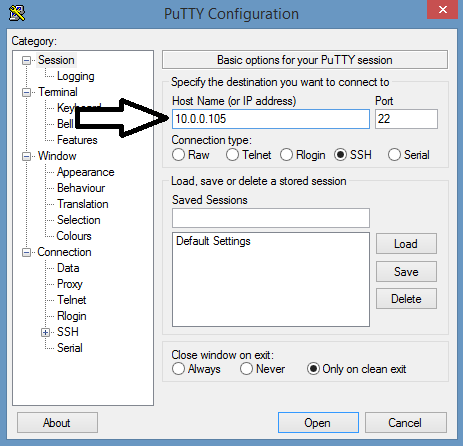
We will log in to Raspberry Pi using a SSH tool putty
Download and run binary putty.exe
Enter the local IP address into the “Host Name” field:Now click “Open” to initiate the connection.
On the first connection attempt, a security warning will appear. Just press “Yes”since you’re connecting to your own Pi:
If the SSH connection is successful you’ll be greeted with the login prompt of your Raspberry Pi:
Now you’re logged in to your Raspberry Pi via SSH:


